 Hello Hello everyone! Its sure is a marvelous Monday! Even though its rather hot outside.. I can't help but stop and thank God that today is just an all around good day. :) Unlike most people, Mondays are probably my favorite day of the week. Why, you ask? Because every Monday is my day off from both jobs. I look forward to Monday all week! So, lets make your Monday just a little better. How? A giveaway! As a baker, I obviously spend a TON of time in the kitchen. I use all sorts of kitchen tools and gadgets. Some of my favorite things are from Tupperware. My mom has been selling Tupperware form a few years now.. so needless to say, I've fallen in love with some of supplies! And today.. I would like to share some with you!
 Mini Salt and Pepper Shakers Giveaway
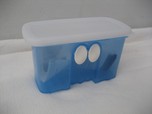
Here's what you could possibly win!
This prize includes 3 separate items.
1. Mini Salt and Pepper Shakers
2. Mini Modular Mate (great for spices and other things!)
3. Mini Fridge Smart (works great for keeping herbs, vegetables, and fruits fresher for longer!)
|  Mini Fridge Smart How to Enter1. Become a fan of my blog on Facebook2. Leave a comment below! Its that easy guys! Don't forget to share this giveaway with your friends so they have a chance to win too! The winner will be picked using random.org. The contest will be ending Sunday July 22 at 11:59pm central time and the winner will be announced sometime on Monday!
| Also be sure to check out my mom's Tupperware site! It really is some of the best products you could ask for! If you have any questions message me here! Good luck everyone! -Jenni
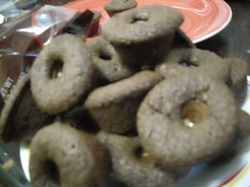 Hello to everyone! Man did I have a busy weekend! Check out the cakes I made! However, now I am home.. and after sleeping for almost 12 hours, I wake up and want cookies, lol. So I look through my books and find nothing in particular that perks my interest. I want chocolate and caramel goodness. The result I have come up with: Chocolate Rolo Cookies. So.Good. And easy!
Chocolate Rolo Cookies 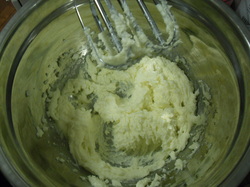 Creamed mixture, before adding the dry ingredients INGREDIENTS
6 Tbl. butter, room temp
1 cup sugar
1 egg
1 cup flour
1/3 cup cocoa, unsweetened
1/4 tsp baking soda
1/4 tsp salt
1/4 cup water
1 tsp vanilla
 DIRECTIONS
1. Preheat oven to 350. Use a cooking spray to coat a mini muffin pan.
2. Using mixer, cream the butter and sugar together until smooth.
3. Add egg and mix.
4. In separate bowl blend the flour, cocoa, baking soda, and salt.
5. Add to dry ingredients to creamed mixture and mix just until blended. Do not overbeat.
6. Add water and vanilla and blend.
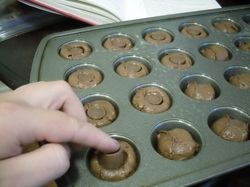
7. Use a 1oz scoop (or just a spoon) to drop batter into each mini muffin cup.
8. Unwrap rolo candies and push one into the middle of each cookie. Don't push it all the way to the bottom of the batter.
9. Bake for 10-12 minutes, rotating the pan halfway through the bake time.
10. Let them cool in the pan for a couple minutes before popping them out.
Now, after trying this the 'cookie' seems more like a brownie.. which is still ok with me! However now I need a big glass of milk.. lol. Give it a try guys! This is an excellent, easy recipe to try with the kids! Don't forget to check out (and 'like')my new facebook page to keep up with new posts and new things coming to Jenni's Baking Blog! Have a question or comment for me? Feel free to message me or leave a comment! I love to hear from you! -Jenni
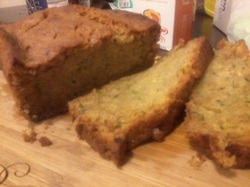 Hello to all! Did you guys enjoy the guest blog from my dear friend Kenzie Sweeney last weekend? I hope so! If you haven't read it yet, you should check it out!! Hopefully Miss Kenzie will be posting for you all again soon! I'm back full force today with another yummy recipe. Thanks to my cousin, Erica and her family, I have recently acquired a ton of zucchini. So a big THANK YOU to Erica and her family for this blog post! If you have never tried zucchini bread, this is an excellent recipe to try with. Very simple and very, very good! And even if you do not like zucchini, I still think you should try this bread. You can't really taste the zucchini, but it makes the bread extremely moist and full of flavor!
 Easy Zucchini Bread
Ingredients:
1 1/2 cups flour
1/2 tsp baking powder
1/2 tsp baking soda
1/2 tsp salt
1/2 tsp ground cinnamon
2 cups shredded zucchini
1 1/2 cups vegetable oil (i use canola)
2 eggs
1 cup sugar
1 tsp vanilla
3/4 cup walnut pieces (optional)
Directions:
Preheat oven to 350. Coat loaf pan with baking spray, (or coat with shortening and dust with flour).
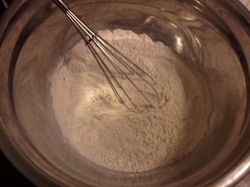
 1. In a small mixing bowl, mix up the flour, baking powder, baking soda, salt, and cinnamon.
2. Use a mixer to beat the oil, eggs, sugar and vanilla in a different mixing bowl. It takes a minute to make sure the oil gets mixed in really well.
3. Add dry ingredients to the wet and mix it all up on low speed.
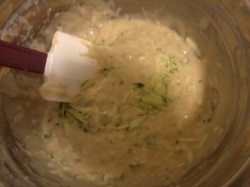
4. Using a rubber spatula, gently fold in the zucchini, and add walnuts if you choose to do so. (I chose not to)
5. Pour into loaf pan.
6. Bake for about an hour or until done. Rotate pan halfway through baking time to achieve even baking.
7. After it is baked, let it cool in the pan for about 20 minutes, then take it out of the pan to finish cooling.
8. Enjoy!
*Personal Note* So due to quite a few complications this past weekend, I was unable to go out of town to meet Brent's family. Instead we stayed at my parents while my mom went back and forth to the hospital for my grandpa. I want to thank everyone for their thoughts and prayers for us! It has helped so much more than I can explain! My grandpa is well enough to go to a nursing home, which is what happened yesterday. However there are still a lot of personal and medical complications that we still need prayers for. Thank you! Also!! Jenni's Baking Blog now has a facebook page! http://www.facebook.com/JennisBakingBlogPlease like my page to keep up on my blog posts and new things that are coming! Also follow me on pinterestIf you have any questions or for me please feel free to comment or message me here. I love hearing from you guys! -Jenni
Hey all! I’m Kenzie Sweeney, Jenni’s guest blogger this weekend. When Jenni asked if wanted to post on her blog, I had the reaction of an overly hyper 8 year old at Christmas time—so.excited. So I want to thank her for is wonderful opportunity!
 A bit about me, I started out as a vocal performance major but am studying Marketing at the University of Evansville. I have this semi-obsessive love of jazz music and baking. Especially cupcakes. So I listen to Frank, Ella, and Mr. Nat King Cole while I bake. I am also a health nut so I made this recipe with Truvia instead of sugar (about 1/3 of the calories and absolutely delicious).
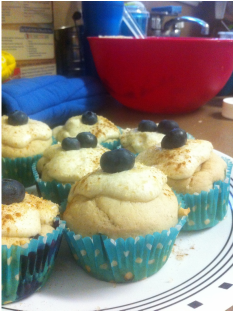
NOW to the reason you’re here: cupcakes.
I personally like putting the frosting on ‘em while they are just a tad warm so it melts into it. It’s like eating a blueberry pancake with maple syrup on top :)
| Cupcakes
~Preheat oven to 350° & bake for 20 min
1 ½ cups all-purpose flour
¼ cup + 2 Tbsp Truvia (or ¾ cups sugar)
½ tsp cinnamon
¼ tsp baking soda
1 ½ tsp baking powder
¼ tsp salt
¾ cup buttermilk
1 egg
½ stick unsalted butter, melted
¼ cup milk
1 tsp vanilla
1 ¼ cup blueberries
| Frosting
½ stick unsalted butter, room temperature
1 ½ cups confectioner’s (powdered) sugar
1 ½ Tbsp pure maple syrup
Pinch of salt
Splash of milk
Splash of vanilla
Cream the butter & sugar together. Add the rest of the ingredients. Beat until light & fluffy!
(Best to make while cupcakes are in the oven) | Substitution for Buttermilk: 1 Tbsp of white vinegar or lemon juice & fill milk up to 1 cup. For this recipe I used 2 ¼ tsp white vinegar and filled the milk up to ¾ cup & let sit for 5 min
Mix dry ingredients
In a separate bowl, light beat butter & egg
Add in the buttermilk & milk
Add the wet ingredients to the dry ingredients
Make sure to mix well!
>Add an extra splash of milk if the batter is too thick<
Toss the blueberries in 2 Tbsp flour & fold into batter | Spoon cupcake batter 3/4s full & bake
Let cool, frost, add your toppin's & voilà! | | Deliciousness in a bite. (hopefully!)
I hope you all enjoy my little creation. I have changed the recipe enough & this version is my favorite. It's one I'd like to make when I open up my own bakery. Keep an eye out for Swenzie's Sweets :) Let me know what you think! --Kenzie PS If you haven't had a bite of something Jenni herself has made, you are missing out on bites of marvelous happiness. Feel free to follow me on pintrest! pinterest.com/classyyellow1/
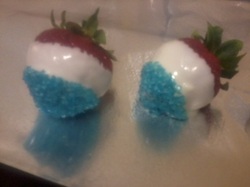 Hello to all! I hope everyone had a lovely and exciting Independence Day yesterday! I spent the day with some wonderful friends. Unfourtantely where I live there was a 'burn ban' because of the insanely hot and dry weather. So there was very minimal fireworks. However we had some great food! Pork tenderloin, bratwurst, mac and cheese (that my honey made, and it was soooooo good!), green beans, corn on the cob, and quite a bit of other things! And of course I brought some dessert. I wanted something simple that wouldn't take long to do... So I made these adorable patriotic strawberries that I found on Pinterest. They were delicious and easy!
Instructions
1. Melt white chocolate
2. Dip strawberry in chocolate, but you still want to see the red on top!
3. Shake off excess chocolate, and while chocolate is still wet, dip the end into blue sugar.
That's it! Super easy and everyone was really impressed!

Then my best friend had made some star shaped sugar cookies and brought them over to help decorate. Basically we colored some frosting in red and blue, then drizzled the leftover white chocolate from the strawberries. Doesn't get any easier than that. :)
Now, as promised in the title, Jenni's Baking Blog is going to have a special guest blogger this weekend! I am going out of town this weekend to meet Brent's family. Yes, I am nervous. That seems to be the first thing anyone asks me. lol Considering they live a good 6 or so hours away, we are going there for the entire weekend. So wish me luck!
As for my special guest, please keep an eye on the blog this weekend for a post from my friend Kenzie Sweeney! I'm anxious to see what she makes for you!
*Personal Note*
h4As a personal favor I am asking everyone to please keep my family in their prayers! My grandpa Lloyd is very ill and is currently in ICU. Tomorrow my mother and her sisters have to make a very hard decision. I won't go into details on here, but we could really use all the prayers and support we can get! Thank you everyone!
Remember to keep an eye on the blog for Kenzie's post this weekend!
-Jenni
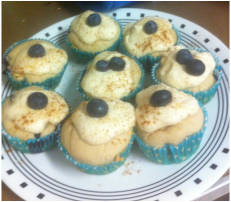
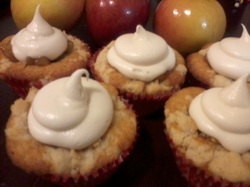 This is one of the most time consuming desserts that I have done because of all the elements to it. But they are so worth it! So if you have an evening off and feel like trying something new in the kitchen, this is perfect! They would also make quite an impression at a picnic or family gathering. :)
This is a 4 part dessert: cake, crumble, filling, and icing. The cake is a mild spice cake with a cinnamon crumble on top. Then it has an apple cobbler filling and just a little vanilla cream cheese icing. :)
Cake
2 cups flour
1 1/4 cup sugar
2 1/2 tsp baking powder
1 tsp salt
1/2 shortening (room temp)(like Crisco)
3/4 cup milk
1 Tbl. vanilla flavor
1/2 tsp almond flavor
2 eggs
1 1/2 tsp ground cinnamon
1 tsp ground cloves
1 tsp nutmeg
(you can increase the amount of spice you put in your cake if you like, this is a mild spice cake)
Preheat oven to 350.
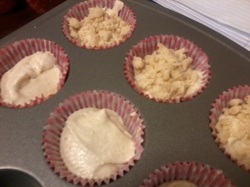
Prepare a cupcake pan with liners and set aside.
Using a mixer, blend together flour, sugar, baking powder, salt and shortening.Add the rest of the ingredients and mix well. Fill cupcake liners 2/3 full with batter. Set aside.
 Crumble
6 Tbl. unsalted butter (room temp)
1 cup flour
1/3 cup sugar
1 tsp cinnamon
In a mixing bowl combine all ingredients and use fork or hands to blend until crumbly. Sprinkle this on top of you cupcakes before you bake them.
Bake the cupcakes for 18-20 minutes (or until toothpick comes out clean), rotating halfway through the baking process to get even baking. Let cupcakes cool.
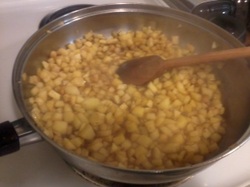 FIlling
2 Tbl. butter
5-6 cups of diced apples
1 Tbl. corn starch
1/2 cup packed brown sugar
dash of salt
1 tsp vanilla
2 Tbl. lemon juice
1 tsp ground cinnamon
1/2 tsp ground nutmeg
1/2 tsp ground cloves
1/2 cup water
Heat up a large skillet to medium and melt butter. Add diced apples and let them cook for about 5 minutes to soften, stirring occasionally. Add brown sugar, salt, vanilla, and lemon juice. Stir in. Sprinkle corn starch over top of apple mixture, and mix in. Let this cook for about 5 more minutes, still stirring occasionally. Add water to reduce the thickness and let cook for 1 more minute. Remove from heat.
* This can be made ahead of time and stored in the fridge in an airtight container. And if you have extra left over, I think it would be sooooo good on pancakes!
Icing
1 8oz pkg cream cheese (room temp)
1 stick unsalted butter (room temp)
2 tsp vanilla flavor
4 cups powdered sugar
Blend first 3 ingredients until smooth. add powdered sugar and blend until smooth and creamy.
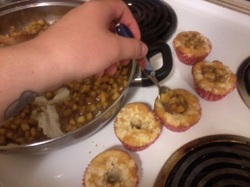 FINALLY!! ASSEMBLY!!
1. Core your cupcakes
2. Pour some of your delicious apple filling in
3. Top with some cream cheese icing
Sadly.. the assembly of this cupcake was the easiest part. lol. But wasn't it worth it!?
So who's up for a challenge with this delicious Apple Cobbler Cupcakes? Please let me know if you tried it! I would love to see how it turned out for you.
 If there is one thing that I get asked make over and over again... this is it. Homemade banana bread. (Does anyone else have to sing that dumb song in your head to make sure you spell 'banana' right? lol)
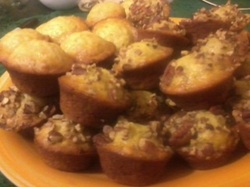
Anyways, this is the best banana bread recipe ever. (no really.. it is.) Its easy to make different ways too! For instance: banana bread loaf, banana muffins, mini banana muffins, mini loafs... depending on what you are wanting it for. :) Also can be made with or without nuts. For this post, I am doing mini muffins. And here is why:
I live with 3 roommates (one that does not like nuts). We all work full time time jobs, and some of us work 2 or 3 jobs. So eating in a hurry is sorta a necessary around here. I make this little muffins, and if they last past the night I bake them (usually they don't), you can put 4 or 5 in a plastic sandwich baggie and either keep them in the fridge, or freeze them. So when everyone is rushing to get off to work and need a breakfast-to-go, they can take out a baggie, open the seal and microwave for 20-30 seconds, and off they go. Its that easy.
 A Note About Bananas
For banana bread, you will get the best flavor out of a brown- spotted banana. The brown spots are actually the natural sugars from the banana and will greatly enhance the flavor of your bread, and make it naturally sweeter. :)
 My recipe:
3-4 brown-spotted bananas
1 cup sugar (for not as sweet bread, you can reduce to 3/4 cup)
1/3 cup melted margarine or butter
1 egg, slightly beaten
1 tsp vanilla
1 tsp baking soda
pinch of salt
1 1/2 cups flour
chopped pecans or walnuts (optional)
Preheat oven to 350.
Use a baking spray (or liners if you prefer) and coat your baking pan.
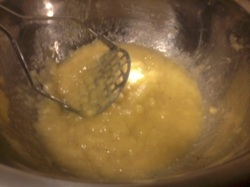
In a mixing bowl, mash up your bananas. I found that a potato masher works best for me. Get out all those lumps. Add sugar, margarine, egg, and vanilla to bananas. Use a spoon to stir. Sprinkle baking soda and salt over mixture and stir in. Then mix in your flour. Your batter will be a little lumpy from the flour.. and that is a-ok. :)
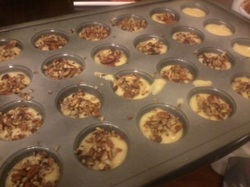 Use a little scoop to fill mini muffin pans 2/3 with batter, a regular ice-cream scoop to fill regular muffin pans 2/3 with batter, or common sense to fill a loaf pan. (just pour it in :) )
I sprinkled chopped pecans on top of (most of) my mini muffins. Leaving a few without nuts for my weird roommate. :P
For mini muffins: bake for 10-12 minutes, rotate them halfway through baking
For regular muffins: bake 15-20 minutes, rotate them halfway through baking
For Loaf: 45-50 minutes, also rotate a couple times during baking.
And there it is. I feel as if I just shared a huge secret to the people that know me. This is super easy, and delicious, and possibly one of my all time favorite things to make. I hope you guys try this recipe! Please, let me know how it goes for you!! :)
-Jenni
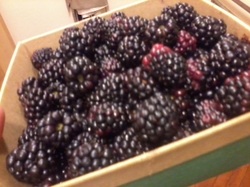 I have been thinking about what I want to put on this site all week. This morning, as I worked at the Pinch Of Sugar bakery (I love my job! :D) I thought about it and I just couldn't settle on any certain idea. Now, I'm pretty sure I have an addiction to this fresh produce stand in town. As I drove by today on my way home I saw the most delicious looking watermelons EVER. So I turned around. As I walk up to the stand I see the biggest, juiciest container of blackberries. So... needless to say I passed on the watermelon... for now. :)
The obvious choice for blackberries was cobbler. But I don't feel like doing the obvious. So here's what I came up with: Mini lemon bundt cakes with a blackberry filling and fresh whipped topping. YES. It sounds soooooooo good!
So here's how things went down in the kitchen tonight:
Preheat oven to 325, coat mini bundt pan with baking spray.
Cake
1 cup butter (unsalted), at room temp
2 cups sugar
3 eggs
1 tsp vanilla
zest of 2 whole lemons
juice of 1 large lemon
3 1/2 cups flour
1 tsp baking soda
1/2 tsp baking powder
1/2 tsp salt
2 cups sour cream
Directions: Cream butter and sugar, add eggs and vanilla. Mix well. add zest and lemon juice. Mix, yet again. Mix dry ingredients in a sepereate bowl. Alternately add dry ingredients and sour cream to creamed mixture. Batter is very thick. Fill mini bundts 2/3 way with batter. Bake for 20-25 minutes or until done. I rotate mine every 7 or 8 minutes so it cooks evenly. For a little extra lemon flavor you can use a toothpick to poke holes in the cake and brush on some more lemon juice. Let cakes cool.
Sauce/Filling
1 1/2 -2 cups of fresh blackberries
1/4 cup apple juice
2 Tbl granulated sugar
1 Tbl honey
2 tsp lemon juice
dash of salt.
Put all ingredients except lemon juice and salt into a sauce pan on medium heat. Let simmer for 10 minutes or so to reduce, stirring occasionally. use spoon to slightly smash some of the blackberries. Add lemon juice and a dash of salt.
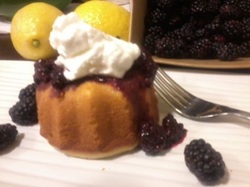 Put sauce on lemon cake, top with a nice delicious dollop of fresh whipped cream. Enjoy... over and over again. :)
So.. what do you guys think? Let me know!! :D
-Jenni
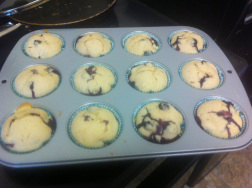
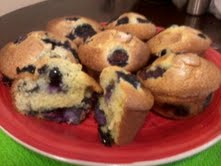 I absolutely love this time of year. And here is why... FRESH PRODUCE. Locally grown berries, squash, green beans, melons.. soooo good. So when I found a stand in town sellling fresh picked BLUEBERRIES, I had to make blueberry muffins.
Here's how I made them:
INGREDIENTS
1 to 1 1/2 cups of fresh blueberries (you can also use frozen if they are out of season!) tossed with 2 tablespoons of flour
Dry Ingredients
2 cups flour
1/2 tsp baking soda
2 tsp nutmeg (I fresh grated my own using whole nutmeg, but you can use ground if it is handy for you)
1/2 tsp salt
1 cup granulated sugar, plus a little for sprinkling
Wet Ingredients
2 eggs
6 tbl vegetable oil (i actually use canola oil because its more heart-healthy :))
1 cup sour cream
Directions:
1.Preheat oven to 400
2. Prepare your muffin pan with liners, or use a baking spray with flour in it to coat the pan
3. In a mixing bowl, combine all dry ingredients.
4. In a separate bowl, combine wet ingredients.
5. Add wet ingredients to the dry ingredients. Mix it all up.
6. Gently fold in blueberries with a spatula or spoon.
7. Fill muffin cups to the top. (I put the remaining few blueberries on top before I baked them) and sprinkle the top of each with a little bit of sugar.
8. Bake for 20-35 minutes until golden brown, and a toothpick comes out clean.
9. Let them cool in the pan for 10 minutes before removing them.
10. Enjoy. :)
NOTE: I super filled the cups and I ended up with 12 delicious, amazing muffins. :)
This is a really easy recipe for beginners and its absolutely delicious. I hope if you try to make these that they turn out wonderfully and everyone loves them! That is if you decide to share. lol If anyone tries this out, let me know how it goes for you! :)
-Jenni
references: The Perfect Recipe Baking Book by Murray Jaffe
Hello to all! This is my first post on my new personal blog (as I'm sure you can clearly tell). I'm still messing with all the settings and little details of the site.. but I promise I will get it in full swing ASAP! :) I strongly encourage anyone and everyone to leave comments and contact me! (assuming I get people to actually follow this? lol) Here goes nothin! Wish me luck!
-Jenni
|
 RSS Feed