 Hey everyone! I hope everyone is doing well! I'm so excited! Thanks to my good friend Jennifer at the Mom2moms facebook page, We not only reached my 100-like goal on my facebook page, we doubled that! I'm not sitting at a little over 260 likes! I'm beyond grateful for everyone's support and I can't wait to hear from all of you!
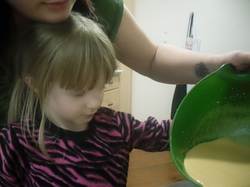
 So, in honor of all my new 'likes', that are mostly from the Mom2moms fan page, I decided to do a recipe that would be easy for you to do with your kids! I however, do not have any kids (yet).. So instead, I have my beautiful 3 year old niece, Emily, here to help me! So here it goes!
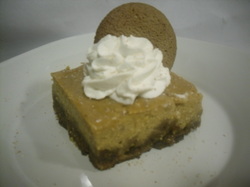
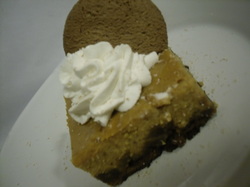
 Pumpkin Pie Bars
Preheat oven to 350.
Crust:
Approx. 2 cups of crushed ginger snaps (about 30 or so)
6 Tbl. melted butter
Directions: To crush ginger snaps, either put them through a food processor, or do what I did and throw them in a gallon size zip lock and let the kiddos have at it with a rolling pin. (Emily seems to have a lot of anger for a 3 year old. lol). Mix crushed cookies in a bowl with melted butter. Press into the bottom of an 8'' square pan.
 Filling:
1 (15oz) can of pumpkin
1 (12oz) can of evaporated milk
2 eggs, beaten
3/4 cup sugar
1 tsp cinnamon
1/2 tsp ground ginger
1/4 tsp ground cloves
1/2 tsp salt
1/2 tsp nutmeg
1 tsp vanilla
Directions: In a mixing bowl, mix all ingredients. (Easy enough, right? lol) Pour over your crust. Bake for 45-50 minutes, rotating halfway through bake time. Let completely cool.
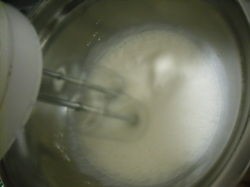 Whipped Topping
1 cup heavy cream
1 tsp vanilla
1 Tbl powdered sugar
Directions: Mix with a hand mixer until stiff peaks form. Top off your delicious pumpkin bars. :) Enjoy!
 For anyone that hasn't yet, please go like my facebook page! It's a super easy and great way to keep up on my blog posts and giveaways! Speaking of giveaways... I believe I promised a giveaway once I reached 100 fans on my facebook page. And as I stated before.. I'm way past that now! SO... I'm thinking that I will do 2 giveaways this go around! I will post up details on that in the next couple days, so keep an eye out for it! Also you can follow my pinterest page, and pin all of my recipes onto your boards! If you have any questions or comments for me, please feel free to comment below, send me a message, or contact me through my facebook page. I look forward to hearing from you guys! Happy Baking! -Jenni
 Hello Hello to everyone! Sorry it's been so long since my last post. It's been a super busy week, and I have so much left to do! But I wanted to make sure you guys heard from me this week and get an awesome easy recipe. :)
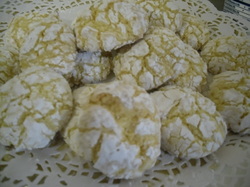
These cookies are so decadent and delicious! They would be perfect for a last minute idea for a party. I've been asked to make them on multiple occasions and they are always a hit! Hope you guys enjoy!
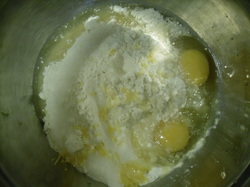 Easy Lemon Cookies
Ingredients:
1 box lemon flavored cake mix
2 eggs
1/3 cup vegetable or canola oil
juice and zest of 1/2 a lemon
about 1/3 cup powdered sugar
 Directions:
1. Preheat oven to 350 and line a baking sheet with parchment paper.
2. In a mixing bowl combine all ingredients except the powdered sugar. Mix well.
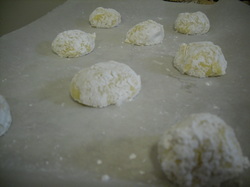
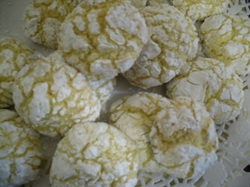
3. Make 1 in balls with the batter. I used a 1 oz scoop for this.
4. Roll each ball in the powered sugar lightly so it is covered and place on a cookie sheet about 2 inches apart.
5. Bake for 10-12 minutes, rotating halfway through bake time.
6. Let cool and enjoy! (makes about 2 dozen cookies)
 This is a really simple and easy recipe. I hope you all enjoy it! Like I mentioned early, I have had a SUPER busy week and I have so much more to do. So I have asked Miss Kenzie Sweeney to return with a guest blog this weekend! I know some of you have wanted to hear from her and this is the perfect time for me. She's a lifesaver and a truly wonderful girl. :) Thanks Kenzie! Oh!! I almost forgot to tell you guys! You are never going to guess who I am going to see this weekend! CAKE BOSS! I'm beyond excited about it! I'll be sure to post up about it after I see him on Sunday. :) Also, if you haven't yet, you need to like my facebook page! So you can stay updated on new recipes, giveaways, and other totally awesome stuff. :) You can also follow me on Pinterest. Have any comments or questions for me? Please feel free to comment below or send me a message. I love hearing from you guys! -Jenni
 Hey everyone! Hope all is well with you!
I've been really busy with work this week... but I managed to get this morning off. My darling Brent had a job interview at 9am this morning and it is now 1pm and he has yet to return with my vehicle. Good sign? :)
Anyways, woke up wanting to do a blog post, but i'm a few ingredients short. And I can't run to the store because Brent has the car. So.. I'm improvising. :)
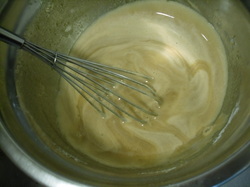 The main ingredient I did not have was a can of sweetened condensed milk. So I found this simple recipe for a condensed milk substitute. It worked great!
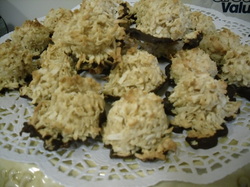
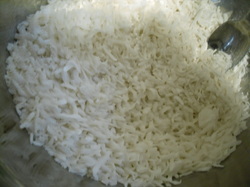 Here's your recipe for today! Easy Coconut Macaroons3 cups flaked coconut 3/4 cup flour 1/8 tsp salt 2/3 cup condensed milk substitute or 1 (14oz) can sweetened condensed milk 1 tsp almond extract
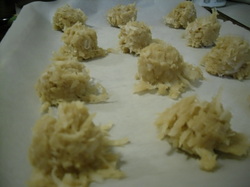 1. Preheat oven to 300. Lightly grease baking pan or line with parchment paper. 2. In mixing bowl, toss the coconut, flour, and salt. Make sure the coconut is evenly coated with the flour. 3. Stir in condensed milk (or substitute) and almond extract. Dough will be sticky! I ended up using my hands to mix it cause it was just easier for me. No harm in getting a little messy. :) 4. Drop by spoon fulls (I use a 1 ounce scoop) onto baking sheet. Bake for 18-20 minutes until golden brown, rotating halfway through the bake time. Cool for 2 minutes on pan before removing.
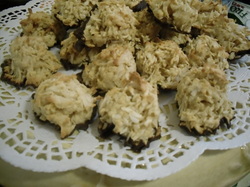 When they cooled some, I dipped the bottoms in dark chocolate. Yummmmm. :) Hope you guys try and enjoy this recipe! Have you 'liked' my facebook page yet? Its a great way to stay notified on blog posts and giveaways! Also follow me on pinterest ! If you have any questions or comments please feel free to leave a comment below or shoot me a message! I love to hear from you guys! Till next time! -Jenni
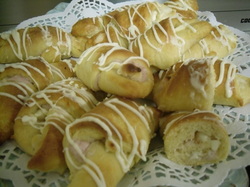 I've been waiting all week for today! First off I would like to say "Thank You!" to all that entered this giveaway, and everyone that shared this giveaway with their friends to get more participants. Also a HUGE "THANK YOU!" to Kathy Henderson (aka my awesome mom) for helping to sponsor me and donating the prize for the giveaway! If you haven't checked out her Tupperware site I highly suggest it! Now, before I get to the winner of the giveaway, of course I have a new recipe for you! Actually, its kind of a 2 in 1 deal. It would be excellent for kids to help with too!
Dessert Croissants White Chocolate-Raspberry 1 can croissants
6 raspberries
1/2 tsp sugar
4 oz cream cheese (room temp)
White Chocolate Chips 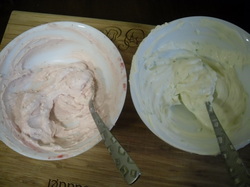 Filling
Puree raspberries and sugar. Add to cream cheese in a small mixing bowl and mix well.
| White Chocolate-Key Lime 1 can croissants
2 key limes
3/4 tsp key lime zest
1/2 tsp sugar
4 oz cream cheese (room temp)
White chocolate chips 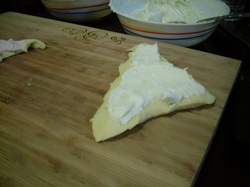 Filling
In a small mixing bowl, combine zest, the juice from the 2 key limes, sugar, and cream cheese. Mix well.
|  Preheat oven to 375.
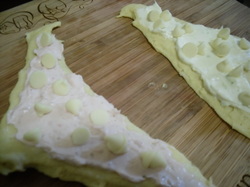
ASSEMBLY
Lay out pieces of croissant dough. Use a spoon to spread the cream cheese mixture onto the dough. (half the pieces with raspberry, the other half with key lime. I wouldn't mix the fillings.. lol) Sprinkle some white chocolate chips over the cream cheese. Roll the croissants. Place on a baking sheet lined with parchment paper. Bake for 10 minutes.
After you pull them from the oven, melt some white chocolate and drizzle over the top. No need to wait for them to cool! They are soooo good warm!
------------------------------------------------------------------------- Now... back to the giveaway... aren't you just DYING to know if you won?? Here it is! The winner for the Tupperware giveaway is.....
MONICA PINNICK!
Congratulations, Monica!
The winner will have 48 hours to claim her prize! Please like my facebook page to keep with with my blog posts and future giveaways! Also, if you are interested in becoming a sponsor of my blog please feel free to contact me! Thanks! -Jenni
 Two of my favorite things combined. Cheesecake. Brownies. Its a win-win. Right? Right! (secret: I used to hate cheesecake. weird right?) Before I get to the recipe though, let me fill you in on whats been going on with me. I want to take a moment to thank everyone for all the prayers and thoughts concerning my Grandpa. He is doing better and they have moved him to a nursing home. Although he doesn't have much time, we're very lucky that he is still with us... even if just for a little while longer. So please keep him in your thoughts! This past weekend I was so super busy! Made a few cakes, held a baby shower for a friend, trying to help another friend with her wedding planning (of course I'm doing the cake lol) that is coming up on August 4th, and also working during all this and trying to help my family concerning my Grandpa. I've just been busy! I don't mind it all, just makes me tired. lol On another note, who's a fan of Linkin Park? I AM! I am a HUGE fan and have been since I was younger. Recently I found out that they are going to be in Noblesville (northern Indiana) on August 25th. Now considering that my birthday is August 15th... don't you think that would be the PERFECT birthday present? I'm just throwing that out there.. lol Also, have you registered for my giveaway yet? You haven't?! Who doesn't want free stuff?! Check it out here! Invite your friends to win too!! You have until Sunday! Okay, okay.. I know you're hear for brownies, not me. So here's your recipe! Preheat oven to 350. Spray a 8" or 9" square baking pan with baking spray.
 Brownies
1 stick (1/2 cup) butter, melted
1 cup sugar
2 eggs
1/2 cup flour
3/4 tsp baking powder
1/2 tsp salt
1/3 cup cocoa powder (unsweetened)
1 tsp vanilla
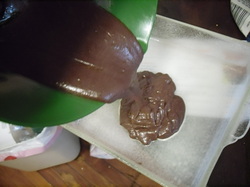
In a mixing bowl, combine butter, sugar, and eggs. Mix well. Add remaining ingredients and mix. Pour into baking pan.
|  Cheesecake
1- 8oz pkg cream cheese (room temp)
1/2 cup sugar
1/2 tsp vanilla
1 egg
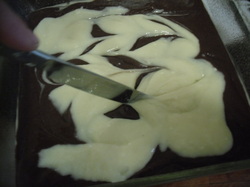
In a mixing bowl, combine all ingredients and mix well. Using a spoon, put blobs of cheesecake batter on top of brownie batter. Using a knife, swirl the cheesecake batter it. Don't mix! Just swirl. :) You will have extra cheesecake batter. SAVE THIS! I guarantee you'll wanna use it for the next batch of brownies.. and it'll save you a step. :)
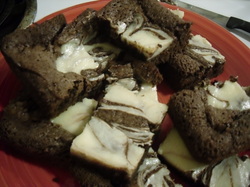
| 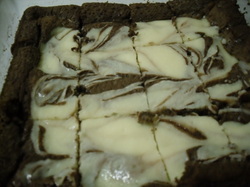 Bake for 25 minutes in preheated oven, rotate halfway through baking. When you take them out of the oven, let them cool in the pan for 20 minutes. Cut into squares, serve with a HUGE glass of milk. :) (chocolate milk for me lol) Don't forget to register for the giveaway! If you have any questions please feel free to comment or message me. Also feel free to follow my facebook page and follow me on pinterest! Enjoy! -Jenni
 Hello to everyone! Man did I have a busy weekend! Check out the cakes I made! However, now I am home.. and after sleeping for almost 12 hours, I wake up and want cookies, lol. So I look through my books and find nothing in particular that perks my interest. I want chocolate and caramel goodness. The result I have come up with: Chocolate Rolo Cookies. So.Good. And easy!
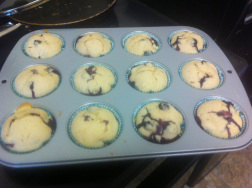
Chocolate Rolo Cookies 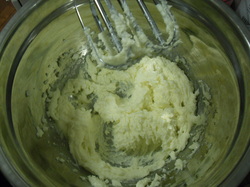 Creamed mixture, before adding the dry ingredients INGREDIENTS
6 Tbl. butter, room temp
1 cup sugar
1 egg
1 cup flour
1/3 cup cocoa, unsweetened
1/4 tsp baking soda
1/4 tsp salt
1/4 cup water
1 tsp vanilla
 DIRECTIONS
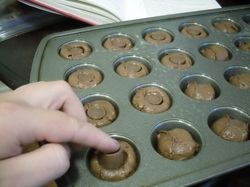
1. Preheat oven to 350. Use a cooking spray to coat a mini muffin pan.
2. Using mixer, cream the butter and sugar together until smooth.
3. Add egg and mix.
4. In separate bowl blend the flour, cocoa, baking soda, and salt.
5. Add to dry ingredients to creamed mixture and mix just until blended. Do not overbeat.
6. Add water and vanilla and blend.
7. Use a 1oz scoop (or just a spoon) to drop batter into each mini muffin cup.
8. Unwrap rolo candies and push one into the middle of each cookie. Don't push it all the way to the bottom of the batter.
9. Bake for 10-12 minutes, rotating the pan halfway through the bake time.
10. Let them cool in the pan for a couple minutes before popping them out.
Now, after trying this the 'cookie' seems more like a brownie.. which is still ok with me! However now I need a big glass of milk.. lol. Give it a try guys! This is an excellent, easy recipe to try with the kids! Don't forget to check out (and 'like')my new facebook page to keep up with new posts and new things coming to Jenni's Baking Blog! Have a question or comment for me? Feel free to message me or leave a comment! I love to hear from you! -Jenni
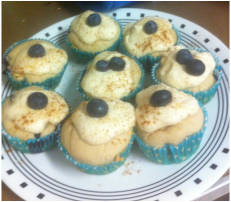
Hey all! I’m Kenzie Sweeney, Jenni’s guest blogger this weekend. When Jenni asked if wanted to post on her blog, I had the reaction of an overly hyper 8 year old at Christmas time—so.excited. So I want to thank her for is wonderful opportunity!
 A bit about me, I started out as a vocal performance major but am studying Marketing at the University of Evansville. I have this semi-obsessive love of jazz music and baking. Especially cupcakes. So I listen to Frank, Ella, and Mr. Nat King Cole while I bake. I am also a health nut so I made this recipe with Truvia instead of sugar (about 1/3 of the calories and absolutely delicious).
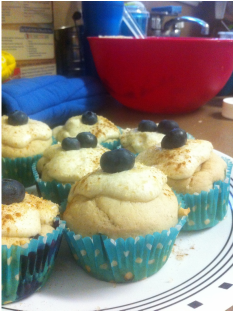
NOW to the reason you’re here: cupcakes.
I personally like putting the frosting on ‘em while they are just a tad warm so it melts into it. It’s like eating a blueberry pancake with maple syrup on top :)
| Cupcakes
~Preheat oven to 350° & bake for 20 min
1 ½ cups all-purpose flour
¼ cup + 2 Tbsp Truvia (or ¾ cups sugar)
½ tsp cinnamon
¼ tsp baking soda
1 ½ tsp baking powder
¼ tsp salt
¾ cup buttermilk
1 egg
½ stick unsalted butter, melted
¼ cup milk
1 tsp vanilla
1 ¼ cup blueberries
| Frosting
½ stick unsalted butter, room temperature
1 ½ cups confectioner’s (powdered) sugar
1 ½ Tbsp pure maple syrup
Pinch of salt
Splash of milk
Splash of vanilla
Cream the butter & sugar together. Add the rest of the ingredients. Beat until light & fluffy!
(Best to make while cupcakes are in the oven) | Substitution for Buttermilk: 1 Tbsp of white vinegar or lemon juice & fill milk up to 1 cup. For this recipe I used 2 ¼ tsp white vinegar and filled the milk up to ¾ cup & let sit for 5 min
Mix dry ingredients
In a separate bowl, light beat butter & egg
Add in the buttermilk & milk
Add the wet ingredients to the dry ingredients
Make sure to mix well!
>Add an extra splash of milk if the batter is too thick<
Toss the blueberries in 2 Tbsp flour & fold into batter | Spoon cupcake batter 3/4s full & bake
Let cool, frost, add your toppin's & voilà! | | Deliciousness in a bite. (hopefully!)
I hope you all enjoy my little creation. I have changed the recipe enough & this version is my favorite. It's one I'd like to make when I open up my own bakery. Keep an eye out for Swenzie's Sweets :) Let me know what you think! --Kenzie PS If you haven't had a bite of something Jenni herself has made, you are missing out on bites of marvelous happiness. Feel free to follow me on pintrest! pinterest.com/classyyellow1/
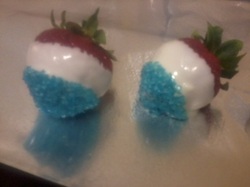 Hello to all! I hope everyone had a lovely and exciting Independence Day yesterday! I spent the day with some wonderful friends. Unfourtantely where I live there was a 'burn ban' because of the insanely hot and dry weather. So there was very minimal fireworks. However we had some great food! Pork tenderloin, bratwurst, mac and cheese (that my honey made, and it was soooooo good!), green beans, corn on the cob, and quite a bit of other things! And of course I brought some dessert. I wanted something simple that wouldn't take long to do... So I made these adorable patriotic strawberries that I found on Pinterest. They were delicious and easy!
Instructions
1. Melt white chocolate
2. Dip strawberry in chocolate, but you still want to see the red on top!
3. Shake off excess chocolate, and while chocolate is still wet, dip the end into blue sugar.
That's it! Super easy and everyone was really impressed!

Then my best friend had made some star shaped sugar cookies and brought them over to help decorate. Basically we colored some frosting in red and blue, then drizzled the leftover white chocolate from the strawberries. Doesn't get any easier than that. :)
Now, as promised in the title, Jenni's Baking Blog is going to have a special guest blogger this weekend! I am going out of town this weekend to meet Brent's family. Yes, I am nervous. That seems to be the first thing anyone asks me. lol Considering they live a good 6 or so hours away, we are going there for the entire weekend. So wish me luck!
As for my special guest, please keep an eye on the blog this weekend for a post from my friend Kenzie Sweeney! I'm anxious to see what she makes for you!
*Personal Note*
h4As a personal favor I am asking everyone to please keep my family in their prayers! My grandpa Lloyd is very ill and is currently in ICU. Tomorrow my mother and her sisters have to make a very hard decision. I won't go into details on here, but we could really use all the prayers and support we can get! Thank you everyone!
Remember to keep an eye on the blog for Kenzie's post this weekend!
-Jenni
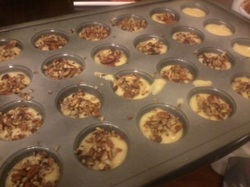
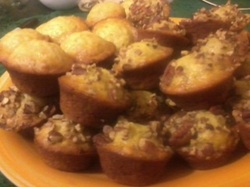 If there is one thing that I get asked make over and over again... this is it. Homemade banana bread. (Does anyone else have to sing that dumb song in your head to make sure you spell 'banana' right? lol)
Anyways, this is the best banana bread recipe ever. (no really.. it is.) Its easy to make different ways too! For instance: banana bread loaf, banana muffins, mini banana muffins, mini loafs... depending on what you are wanting it for. :) Also can be made with or without nuts. For this post, I am doing mini muffins. And here is why:
I live with 3 roommates (one that does not like nuts). We all work full time time jobs, and some of us work 2 or 3 jobs. So eating in a hurry is sorta a necessary around here. I make this little muffins, and if they last past the night I bake them (usually they don't), you can put 4 or 5 in a plastic sandwich baggie and either keep them in the fridge, or freeze them. So when everyone is rushing to get off to work and need a breakfast-to-go, they can take out a baggie, open the seal and microwave for 20-30 seconds, and off they go. Its that easy.
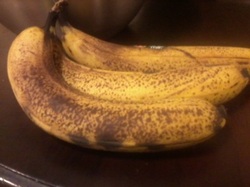 A Note About Bananas
For banana bread, you will get the best flavor out of a brown- spotted banana. The brown spots are actually the natural sugars from the banana and will greatly enhance the flavor of your bread, and make it naturally sweeter. :)
 My recipe:
3-4 brown-spotted bananas
1 cup sugar (for not as sweet bread, you can reduce to 3/4 cup)
1/3 cup melted margarine or butter
1 egg, slightly beaten
1 tsp vanilla
1 tsp baking soda
pinch of salt
1 1/2 cups flour
chopped pecans or walnuts (optional)
Preheat oven to 350.
Use a baking spray (or liners if you prefer) and coat your baking pan.
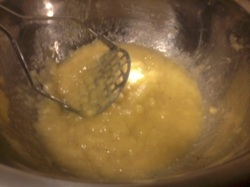
In a mixing bowl, mash up your bananas. I found that a potato masher works best for me. Get out all those lumps. Add sugar, margarine, egg, and vanilla to bananas. Use a spoon to stir. Sprinkle baking soda and salt over mixture and stir in. Then mix in your flour. Your batter will be a little lumpy from the flour.. and that is a-ok. :)
 Use a little scoop to fill mini muffin pans 2/3 with batter, a regular ice-cream scoop to fill regular muffin pans 2/3 with batter, or common sense to fill a loaf pan. (just pour it in :) )
I sprinkled chopped pecans on top of (most of) my mini muffins. Leaving a few without nuts for my weird roommate. :P
For mini muffins: bake for 10-12 minutes, rotate them halfway through baking
For regular muffins: bake 15-20 minutes, rotate them halfway through baking
For Loaf: 45-50 minutes, also rotate a couple times during baking.
And there it is. I feel as if I just shared a huge secret to the people that know me. This is super easy, and delicious, and possibly one of my all time favorite things to make. I hope you guys try this recipe! Please, let me know how it goes for you!! :)
-Jenni
|
 RSS Feed